Day27 | JS DOM
❒ DOM ( Document Object Model )
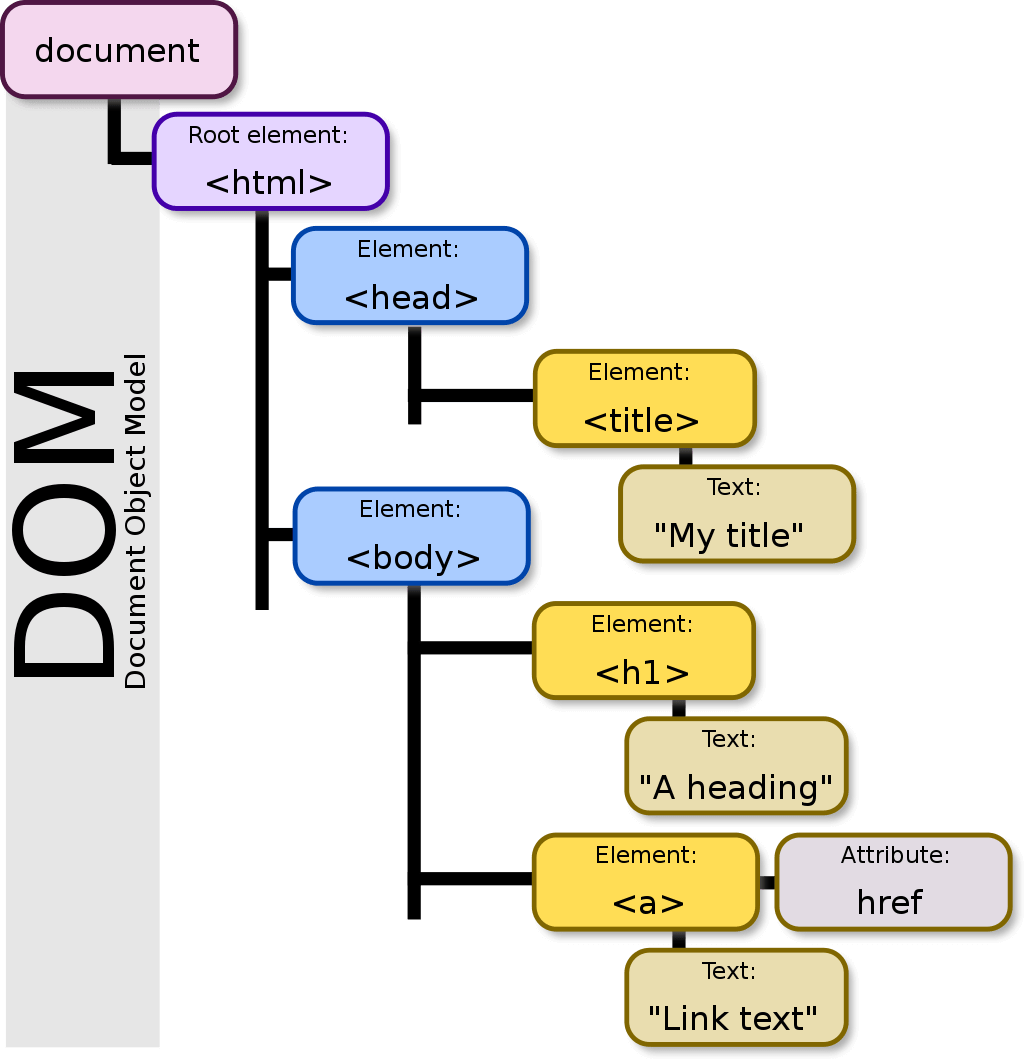
DOM 結點樹 維基百科
方便 js 選取
方便 css 渲染到對應標籤
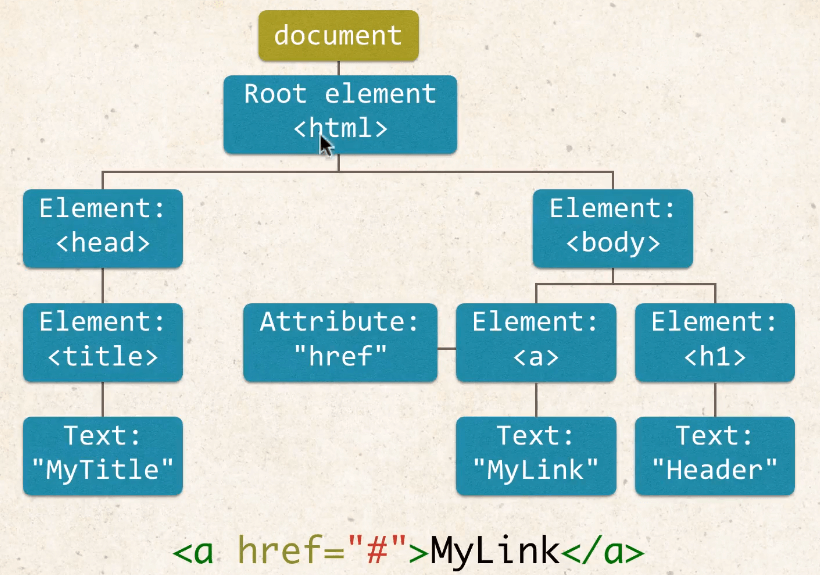
當解析完一個網頁內容 ( 開啟一個網頁 ),會生成一個 DOM 也就是網站的節點樹 ( dom tree ) 如下,Document 為最根目錄的地方,所以要先從根目錄開始選取才能選到裡面的標籤 ( 例如 h1 、a )。
簡述 : 網頁一打開,會生成出一個 document。
瞭解 document 重要性 ( 以 HTML 解說 )
- 網頁在解析瀏覽器時,會先產生 Document ,Document 內就會依序解析裡面有些甚麼元素。
- 可從 JS 內改 HTML 內的文字,例如
document.getElementById().textContent,就是從 Document 依序往內找到 Text 更改裡面的文字。
DOM 環境配置
出處 : JavaScript 工程師養成直播班 - 2021 春季班 影音
1 | <body> |
- 把
<script src="js檔案位置"></script>放置到</body>結尾前。 - 為什麼要放
<body>內而非<head>→ 網頁打開,會從上往下執行,<body>內的標籤轉化為 DOM 節點後,再依序往下執行 js 檔案才能夠解析到這些 DOM 節點。( 產生之後才能夠讀取 )
document.body
- Document 介面代表所有在瀏覽器中載入的網頁,也是作為網頁內容 DOM Tree(包含 、
與其它的元素)的進入點。
Document.body主要是「回傳目前文件的<body>節點,如元素不存在則回傳null」,因此只有body能使用。其他常見選取 DOM 節點的方法,建議使用:
根據傳入的值,找到 DOM 中 ID 為 ‘xxx’ 的元素 →
document.getElementById('xxx');。針對給定的 Selector ( 選擇器 ) 條件,回傳第一個或所有符合條件的 NodeList ( 節點列表 )。
1
2document.querySelector('xxx');
document.querySelectorAll('xxx');
❒ querySelector 與 getElementById 選擇單一元素
範例 1. 使用變數縮短程式碼,使用 getElementById
getElementById只可用來選取 ID ( 加井字號#) 的語法。- CodePen範例
1
<h1 id="textId" class="textClass"> text </h1>
1
2
3
4
5
6// 程式碼太長
// document.getElementById('textId').textContent = '123';
// 使用變數縮短程式碼
const element = document.getElementById('textId');
element.textContent = '13579';範例 2. 使用 querySelector
querySelector()可以用來選取 ID ( 加井字號#) 或 CLASS ( 加點.) 的語法。- CodePen範例
1
2
3<h1 id="textId" class="textClass">
<em>text</em>
</h1>1
2const element = document.querySelector('.textClass em')
element.textContent = '2468';getElementById()與querySelector()差異 ?- 兩者相同點 : 選取 HTML 元素。
- 相異點
getElementById()選取元素侷限於 IDquerySelector()選取元素包含 HTML 標籤、 ID 元素 、 CLASS 元素 。
❒ querySelectorAll 可重覆選取多個元素
querySelector()與querySelectorAll()差異 ?querySelector()只會抓第一筆資料做更新querySelectorAll()可選擇多筆資料做更新範例 1.
querySelector()只會抓第一筆資料做更新1
2
3
4
5
6<h1 id="textId" class="textClass">
<em>text</em>
</h1>
<h1 id="textId" class="textClass">
<em>text</em>
</h1>1
2var element = document.querySelector('.textClass em');
element.textContent ='123';解析
- 因為
querySelector()只會抓第一筆資料做更新,所以只有第一筆有改到內容。

範例 2. 不知陣列數量使用
querySelectorAll選擇多筆資料做更新1
2
3
4
5
6
7
8
9const element = document.querySelectorAll(".textClass em");
// element 數量
const elementTotal = element.length;
for (let i = 0; i < elementTotal; i++) {
//不要把陣列內的數值寫死,所以寫i,讓他去跑小括號內的條件
element[i].textContent = "text一起做更改";
}querySelectorAll可選擇多筆資料做更新,指定的東西會回傳陣列。- 不知陣列數量 : 寫 for loop ( 迴圈 ) 。
- 用
length查數量,再帶入迴圈中
- 用
- 不知陣列數量 : 寫 for loop ( 迴圈 ) 。
範例 3. 知到陣列數量使用
querySelectorAll選擇多筆資料做更新1
2
3
4
5
6<h1 class="textClass">
<em>text</em>
</h1>
<h1 class="textClass">
<em>text</em>
</h1>1
2
3const element = document.querySelectorAll('.textClass em')
element[0].textContent = 123;
element[1].textContent = 123;- 知道陣列數量 : 依序在 Array 中帶值進去 。
querySelectorAll指定的東西會回傳陣列。- 明確知道
.textClass em數量,就可以依序帶值進去
❒ setAttribute 增加、修改標籤屬性
結構:
setAttribute( '要更改的屬性' , '更改的屬性值' )範例 1. 透過 JS 動態新增 HTML 中
<a>標籤的連結1
2
3<h1 class="textClass">
<a href="#">title</a>
</h1>1
2const element = document.querySelector('.textClass a');
element.setAttribute('href','https://google.com');****CodePen範例
範例 2. 透過 JS 動態增加屬性調整文字顏色,把文字由黑變紅
1
<div id="textHere">Hello</div>
1
2
3
4const element = document.getElementById('textHere');
//動態改變 textHere 屬性
element.setAttribute('ID','textRed');- 新增一個紅色文字 id 於 css 中,並使用
setAttribute把此屬性新增於element上,Hello 文字由黑變紅。 - 可由開發者工具看到 HTML 內由 JS 動態新增了
id="strID"

❒ 從HTML 取出值的辦法 ( 撈出屬性、結構、文字 )
getAttribute→ 取出 HTML 中的屬性innerHTML→ 取出 HTML 中的結構textContent→ 取出 HTML 中的文字範例 1. 撈出 HTML 中 h2 標籤內的 a 連結網址
1
2
3
4
5<h1 class="textTitle">TITLE</h1>
<h2 class="textLink">
<a href="https://google.com">LINK</a>
</h2>
<div class="textTex">Hello</div>1
2
3
4
5
6
7
8// 方法 1.
const element = document.querySelector('.textLink a').getAttribute('href');
console.log(element);
// 方法 2
const element = document.querySelector('.textLink a');
console.log(element.getAttribute('href'));- 使用
getAttribute('屬性')方式可以撈出 a 標籤內的連結。
範例 2. 取出
.textLink的 HTML 結構1
2
3<h2 class="textLink">
<a href="https://google.com">LINK</a>
</h2>1
2
3
4
5
6
7
8
9
10
11//方式一
const element = document.querySelector('.textLink')
console.log(element.innerHTML);
//會撈出 h2 內的所有結構
//<a href="https://google.com">LINK</a>
// 方式二 :先賦予在變數上
const element = document.querySelector('.textLink')
const content = element.innerHTML;
console.log(content);- 使用
innerHTML取出h2標籤內的a結構。
範例 3. 撈出 HTML 中 h1 標籤中的文字
1
2
3
4
5<h1 class="textTitle">TITLE</h1>
<h2 class="textLink">
<a href="https://google.com">LINK</a>
</h2>
<div class="textTex">Hello</div>1
2const element = document.querySelector('.textTitle').textContent;
console.log(element);textContent: 只會抓節點內的 『 文字 』 資訊。
❒ 表單取值與更改值方式 value
出處 : avaScript 工程師養成直播班 - 2021 春季班 影音
範例 1. 取出 input 表單中 “ 你好嗎 ? “ 的文字

1
<input type="text" class="txt" value="你好嗎?">
1
2
3
4const txt =document.querySelector('.txt');
//文字寫在 value 上,直接用 txt 選取 value
console.log(txt.value); // 你好嗎範例 2. 更改 input 表單中 “ 你好嗎 ? “ 的文字
1
<input type="text" class="txt" value="你好嗎?">
1
2
3
4// 修改 list.value 的作用也不是給 select 賦予 value 值,而是更改它所指向的 option
const txt = document.querySelector('.txt');
txt.value = "Hello !";
console.log(txt.value); // Hello範例 3. 取出 input 下拉選單表單中的文字

1
2
3
4<select class="list">
<option value="高雄市">高雄市</option>
<option value="台北市">台北市</option>
</select>1
2const list =document.querySelector('.list');
console.log(list.value);範例 4. 設定 input 下拉選單顯示的 option 文字
下拉式選單的文字釘在台北市上。

1
2
3
4<select class="list">
<option value="高雄市">高雄市</option>
<option value="台北市">台北市</option>
</select>1
2
3
4// 修改 list.value 的作用也不是給 select 賦予 value 值,而是更改它所指向的 option,因此 console.log(list.value); 一次只會出現一個值。
const list =document.querySelector('.list');
list.value = "台北市";
console.log(list.value);為什麼
console.log(list.value);只讀取到高雄市 ?listDOM 是選取到select這個標籤,select本身是沒有value值的,它實際上只是回傳它所選取到的那個option的value,並不是直接指向option。
修改list.value的作用也不是給select賦予value值,而是更改它所指向的option,因此console.log(list.value);一次只會出現一個值。1
2
3// 可看出 select 本身沒有 value 屬性,但可以回傳它所選取到的那個 option 的 value
const list =document.querySelector('.list');
console.log(list.getAttribute('value')); //回傳 null
❒ 插入 HTML 標籤的兩種方法
用 JavaScript 操控 HTML 的方法
innerHTML- 方法 : 組完字串後,傳進語法進行渲染。
- 優點 : 效能快。
- 缺點 : 資安風險,要確保來源沒問題 。
- 特性 : 會在指定的區域把原來的內容清空,放入新的值。
createElement('')- 方法 : 以 DOM 節點來處理。
- 優點 : 安全性高。
- 缺點 : 效能差 。
- 特性 : 會保留原本內容,新增的值會依序動態加在原內容後方。
➊ innerHTML
innerHTML有個特性,會在指定的區域把原來的內容清空,放入新的值。範例 0. 在 main 標籤中使用 innerHTML
1
<div class="main">TITLE</div>
1
2const main = document.querySelector('.main');
main.innerHTML = '<h1>TITLE</h1>';- 原本的
TITLE被清空,以<h1>TITLE</h1>取代。

範例 1. 在
<div id="main"></div>內塞 H1 標籤1
<div id="main"></div>
1
2
3
4
5
6
7
8
9
10
11//方法1
//'<h1>TITLE</h1>' 也可以寫入class
const element = document.getElementById('main');
element.innerHTML = '<h1>TITLE</h1>'
//方法2
const element = document.getElementById('main');
const titleElement = '<h1>TITLE</h1>';
element.innerHTML = titleElement ;
// 試試 element.innerHTML = titleElement + titleElement; 會跑兩次唷!
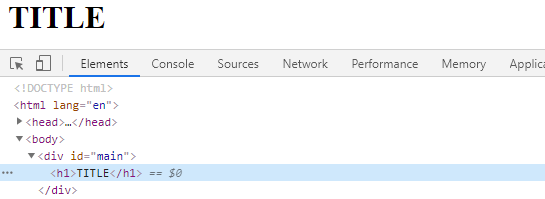
// 從開發者工具可見,#main 內新增了 h1 標籤 ▲➤ ES6 之前的寫法
"<h1 class="blue">123</h1>"- - - 錯誤'<h1 class="blue">123</h1>'- - - 正確外與內的單引號和雙引號需不同,否則解釋器會因無法分辨開頭結尾而報錯誤。
➤ ES6 樣板字面值寫法 ( 使用反引號 ```` tab 上方的按鍵 )
<h1 class="blue">123</h1>
字串使用反引號 ```` 就是 ES6 的樣板字面值寫法,樣板字面值寫法的好處是可以用${ }直接帶入變數,不需使用+將每個字串及變數相加。ES6 樣板字面值運用
內容太龐大,可以使用變數以組字串方式帶入 innerHTML,這邊使用
ulli為範例。範例 1. 把 li 內容帶入 ul 中 Codepen範例 ( ES6 之前寫法 )
HTML :
<ul class="list"></ul>1
2
3
4
5
6
7
8const element = document.querySelector('.list');
let name = '卡斯柏'
let webSite = 'https://www.google.com';
//注意內外雙單引號用法& 變數帶入時前後以引號和加號包覆
//先在li外面用引號包起,再把裡面要帶入變數的用不同的引號包起,記得前後要有加號。
element.innerHTML = '<li><a href = "'+webSite+'">'+name+'</a></li>' ;
範例 1-1. 把 li 內容帶入 ul 中 ( ES6 樣板字面值寫法 )
1
2
3
4
5
6const element = document.querySelector('.list');
let name = '卡斯柏';
let webSite = 'https://www.google.com';
// 使用樣板字面值寫法 - 不須擔心雙引號與單引號錯誤使用
element.innerHTML =`<li><a href='${webSite}'>${name}</a></li>`;另外也可賦予字串變數,日後如果要新增很多個 li ,可以於 innerHTML 使用組字串的方式,如下 :
1
2
3
4
5
6
7const element = document.querySelector('.list');
let name = '卡斯柏';
let webSite = 'https://www.google.com';
let content = `<li><a href='${webSite}'>${name}</a></li>`;
element.innerHTML = content + content;➋ innerHTML 搭配 for loop 運用
從 Array 中撈出資料,顯示在網頁上。
範例 1. 列出每個農場農夫的名字。 CODEPEN
1
2
3
4
5
6
7
8
9
10
11//農場陣列資訊
const farms = [
{
farmer: '卡斯伯',
dogs: ['詹姆士', '龐德']
},
{
farmer: '查理',
dogs: ['皮皮']
},
];防止資料被蓋掉
innerHTML特性 : 新帶入的值會把舊的值蓋過,所以查理會蓋過卡斯伯。迴圈內每把變數farmersTotal帶入跑一次迴圈,組好字串帶入又會把先前資料蓋過。- 先寫一個
let farmersName = '';空值的全域變數,來做累加字串。 let farmersName = '';本來是空字串,在迴圈內farmersName += farmersAllName;依序加入變數 farmersAllTotal 的內容 (<li>${farms[i].farmer}</li>;),就會有第一筆、第二筆依序跑出陣列中所有資料。
1
2
3
4
5
6
7
8
9
10// 錯誤寫法
const element = document.querySelector('.list');
const farmsLength=farms.length;
for( let i=0; i<farmsLength; i++){
let farmersAllName = `<li>${farms[i].farmer}</li>`;
// innerHTML 有新值會把舊值蓋掉的特性,所以每跑迴圈一次就會蓋掉之前的資料。網頁都只會顯示查理
element.innerHTML = farmersAllName;
}1
2
3
4
5
6
7
8
9
10// 正確:for 迴圈寫法
const element = document.querySelector('.list');
const farmsLength=farms.length;
let farmersName='';
for(let i=0; i<farmsLength; i++){
let farmersAllName = `<li>${farms[i].farmer}</li>`;
farmersName+=farmersAllName;
}
element.innerHTML=farmersName;1
2
3
4
5
6
7// forEach 寫法
const element = document.querySelector('.list');
let farmersName = '';
farms.forEach((i) => {
farmersName += `<li>${i.farmer}</li>`;
})
list.innerHTML = farmersName;❒ createElement 搭配 appendChild 寫法
createElement('')會保留原本內容,新增的值會依序動態加在原內容後方。 CODEPENappendChild()在節點增加最後一個子節點。- 下方範例可見,網頁中的 TITLE 並沒有被清空,新增的值 123 依序的排在 TITLE 後方。
拆解步驟
- HTML 內新增一個節點。
const str = document.createElement('em'); - 新增節點內容 ( 動態新增文字內容 ) 。
str.textContent = '123'; - 因為前方未設定節點位置,所以這邊把節點掛在 H1 (
.title) 內。document.querySelector('.title').appendChild(str);
使用
appendChild()會動態掛在 HTML 裡面元素<em>TITLE</em>的最後面位置。1
2
3<h1 class="title">
<em>TITLE</em>
</h1>1
2
3
4
5
6
7
8
9
10
//新增一個節點 (新增 p 元素)
const str = document.createElement('p');
//動態增加內容 → 變數str 放置123文字內容。
str.textContent = '123';
//新增子節點 → 在 .title 的位置掛上子節點,子節點內放入上方新增的 p段落與文字內容 123。
document.querySelector('.title').appendChild(str);範例 1. 在 HTML 內動態新增文字 567 ,並設定紅色。 codepen
1
2
3
4
5
6
7
8
9
10
11
12<head>
<style>
.textRed {
color: red;
}
</style>
</head>
<body>
<h1 class="title">
<em>TITLE</em>
</h1>
</body>1
2
3
4
5
6
7
8
9
10
11
12
13
14
15//-------方法一
//取出容器
var space = document.querySelector('.title');
//新增p元素
var element = document.createElement('p');
//新增文字
element.textContent = '567';
//新增屬性
element.setAttribute('class','textRed');
//把 element(元素、文字、屬性都在裡面) 丟到容器內
space.appendChild(element);1
2
3
4
5
6
7
8
9
10
11//-------方法二
//新增節點標籤
let element = document.createElement('p');
//新增節點內容 & 新增 class
element.textContent = '567';
element.setAttribute('class','textRed');
//設定節點位置 (在.title後方掛上子節點,加入上方新增的標籤與內容 )
document.querySelector('.title').appendChild(element);❒ createElement 與 for loop 運用
三步驟
- 新增節點標籤
- 新增節點內容
- 設定節點位置
範例1. 列出每個農場農夫的名字。
1
2
3
4
5
6
7
8
9
10
11//農場陣列資訊
var farms =[
{
farmer:'卡斯伯',
dogs:['詹姆士','龐德']
},
{
farmer:'查理',
dogs:['皮皮']
},
];❒ XSS 跨網站指令碼注意事項(Cross-site scripting)
XSS ( Cross-site scripting ) 跨網站指令攻擊 :
innerHTML只是其中一個可以使用 XSS 的方法。刻意在 HTML 標籤或 JavaScript 埋一些惡意程式碼,做攻擊的動作。不是讓使用者自己做操控 →
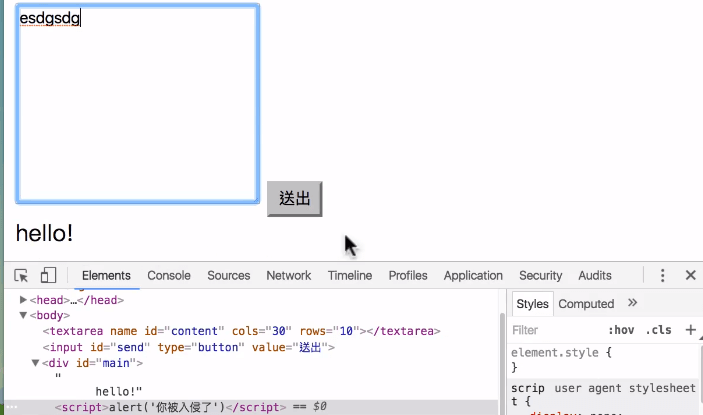
例如 : 留言板等表單輸入的東西,A 用戶留完 B 用戶看的到,但 A 用戶在裡面塞
<script src='病毒.js'></script>,雖然網頁表面看不到,但在開發者工具查看會發現已被植入病毒。通常這些讓用戶自行輸入的留言板,會做一些排錯,過濾掉可疑的語法,都確認沒有錯了才會送入資料庫。

可信任 → 政府提供的 open data 或自己建立的資料庫,例如 : 鄉鎮陣列資料庫 .. 等
資料來源
- JavaScript 入門篇 - 學徒的試煉
- W3school - JavaScript HTML DOM
0%